Showing posts with label crafts and sewing. Show all posts

Friday, October 22, 2010

Hurricane Sluricane

The other day I was online window shopping at work (it was during my dinner break, i swear) and feel in love with this:img49m

Williams-Sonoma Rustic Glass Hurricane

And then there was this:img33m

Avery Hurricanes

Of course neither are in the price range I can afford. Nor would I buy them because they would be broken within weeks by my monsters kids. But then I came across this:31tSOAN7idL__AA260_

15" Hurricane Candle Holder

And I almost bought a few of them until I remembered what I had seen earlier this week at the Dollar Tree:Picture 008 

So now I have these:Picture 009

Which look great right here in my entrance like this:Picture 011

Thursday, October 14, 2010

Halloween Banner

I have a beautiful mantel above my fireplace and for some odd reason I have absolutely nothing to hang from it. So I changed that very quickly! :)

What you’ll need:

Halloween Paper - The paper I used was from My Mind’s Eye "Spooked" 2008 collect. I found it at Big Lots awhile ago.

Cricut or traceable templates - You’ll need a base shape, overlay shape, and letters.

Ribbon

Glue stick

Razor

Super easy steps:

1. Cut out your shapes. I choose a 5.5” circle, 4” blacked-out “flower”, and my letters are 2” cuts. Of course you can make yours any size you like.P90601812. Next you’ll want to glue your pieces together. I decided to make my overlay shape solid black because I thought it looked to busy with it being a print.P9060184 3. With your razor slice a large enough opening for your ribbon 1/4 of the way down from the top on both sides of your letters.Pictures 16094. Lace ribbon through your die cut by entering the top of your first letter and then exiting the letter by coming up through back. Repeat with the remaining letters.Pictures 16105. Cute banner for the mantel. :)Pictures 1611

Wednesday, October 13, 2010

Skulls, Pumpkins, Oh MY!

I have a beautiful mantel above my fireplace and for some odd reason I have absolutely nothing on it. So I got to thinking  (i know scary!) what are some key elements to Halloween? Skulls and pumpkins were the first to come to mind. Then I thought (yes, that would be 2 thoughts in one day. OVERLOAD) what says super cute Halloween decor more then glitter? Um, nothing! Glitter it is!!
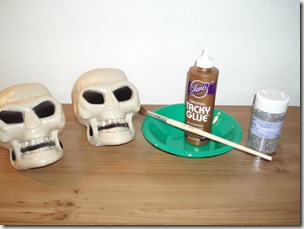
P9040164

I recommend working over a cookie sheet for this project. I also lined my cookie sheet with foil so when it was time to pour the extra glitter back into the container it was easier. Wax paper would probably work better but I was all out.

All you need to do is use a paint brush and coat the skull with glue. Make sure you work in small sections so the glue doesn’t dry out before getting covered with glitter. If you notice a spot lacking glitter, just recoat that area with glue and then re-glitter. Tap the object a few times once it’s dry to knock off any extra glitter. Then pour left over glitter back into your container. And now your done!

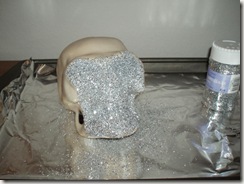
P9040168P9040169 Pictures 1601

Throw some color on the pumpkins and you get these…

Pictures 1602

I was able to find the skulls at the Dollar Tree and the pumpkins came from Joann’s. They were apart of the “8 Harvest Mix” bagged decor. I lucked out with them being 50% off plus another 30% off because one was chipped. Coming to .25 a pumpkin. I’m no genus but that’s cheaper then the Dollar Tree! :)

Monday, October 11, 2010

Halloween Wreath

I LOVE to decorate for the holidays and Halloween is no expectation! The only thing is, I like cute and fun Halloween decorations. Not the typical blood, guts, and skulls stuff. So when I came across this super cute Halloween Wreath I just knew I had to make it. I did do a couple things different, but it still turned out great!

Items Needed:

12” Wreath

1 1/2” Ribbon (18 foot spool)

Multiple 3/8” & 5/8” matching ribbon (appx. 900/1000” total)                                                               

3 and 1 Numbers                                                     

Glitter Paint                                                                   

Hot glue gun                                                              

Extra ribbon to hang wreath (appx. 2 feet)                               

Steps:

1. Wrap 1 1/2” ribbon around your wreath (I found this ribbon in the clearance bin at Joann’s for $1).Pictures 15532. Cut the 3/8” & 5/8” ribbon into 5” sections. (I did cut a few 4.5” sections to use on the inside of my wreath).  Most of my ribbon was bought at the $1 Tree and in the $1 section of Target.Pictures 1551 3. Fold ribbon in half and sew together, making a long strip.Pictures 15574. Now cut between each ribbon, separating them from the strip.Pictures 15585. Open the bottom of your sewn piece and apply hot glue. Then place on your wreath. Work in small sections till you fill the wreath. Pictures 15596. Paint your numbers using glitter paint (next time I’ll apply an undercoat so I don’t have to apply so many coats of the glitter paint).     P90601757. Once the numbers are dried glue to the front of your wreath. Then turn over and glue matching ribbon onto the back of the wreath as the hanging ribbon. You can simply loop the wreath through the ribbon but I didn’t like how it smashed the front ribbon.P90601738. Now hang your SUPER CUTE Halloween wreath!!P9060179

Wednesday, August 25, 2010

Recent Projects

With the kids back in school I really thought I would have more time to work on my projects. I even had it all planned out. Instead of sewing at night when I got home from work, I would sew during the morning while enjoying a nice hot cup of coffee. Seriously, what was I thinking? Sew with just Baby Girl home? YEAH RIGHT!

So needless to say… I have a bunch of fabric and tons of ideas but absolutely no time to do anything with either one of them! Oh the joys of being a stay home and working momma. Wouldn’t it be great if we could buy time? I would totally trade in my shoe addiction for a couple more hours in a day. Well, maybe. OK… probably not. ;)

Baby Alexia: 36964_412078648953_832343953_4316666_4901838_n36964_412078653953_832343953_4316667_3522497_n36964_412078643953_832343953_4316665_2702890_n

Baby Cooper:27840_404356568953_832343953_4118736_3958798_n27840_404356573953_832343953_4118737_1662745_n

Monday, July 12, 2010

Flower Petal Backpack

I’m going to apologize in advance for the crappy pictures. I took them on my cell phone and I’m not cool enough to have one of those fancy Iphones. :)30485_412783298953_832343953_4330566_3147968_n~Materials:                                                                                                               1 backpack                                                                                                               1 bag of flower petals                                                                                        hot glue gun

All I did was stuff the bag with paper to give it some kind of form and then started gluing on the flower petals. I started my rows from the bottom of the bag and worked my way up. That way I was able to see an open spots once I was done.34098_412783223953_832343953_4330565_1752552_n I found the canvas backpack at Michael’s for about a $1 and the flower petals I found at the Dollar Tree. Making this adorable backpack $2!!28237_412783168953_832343953_4330564_57650_n

Baby Girl on the 4th of July with her new backpack:Pictures 349

Thursday, June 17, 2010

Our Summer List

I first saw this cool idea on Debbie’s Blog and thought this would be a really fun thing to do with the kids. Not only would it allow them to choose things they would like to do over the next few months, but it would also help us implement our rewards system with them better. Then I saw the same idea, with a little twist over on Eighteen25 and knew I must do it this way. Of course I’ll be kicking myself in the ass when I’m up at 2am doing it, but oh well. :)Pictures 328

~Materials~                                                                                                              1. 11x17 poster frame ($4 at Walmart)                                                      2. 12x12 scrapbooking paper (5 for $1 at Joann's)                                3.  Black dry easer marker                                                                                 4. Glue stick                                                                                                           5. Kid(s) with a great imagination!

  • Cut a 5x11 piece of paper for the header
  • Cut 1x11 strips with 3 pieces of your paper
  • Cut 1 piece of paper to 11x12Pictures 331
  • Glue down your header paper and 11x12 paper
  • Next arrange 1x11 strips and then glue those down
  • Place glass top back into framePictures 332
  • Now have fun with your kids and write out your summer list!!!Pictures 335

Friday, June 4, 2010

Teacher Goody Box

I would LOVE to take credit for this super cute and fun idea, but I can’t. Jennifer from Eighteen25 posted this clever idea for teacher appreciation week back in April and with it being the end of the school year, I decided to putting it to use. Thanks Jen! :)

Step 1: Get yourself a craft box (I got mine at Walmart since that’s where I was shopping at the time. It was $2)Pictures 040Step 2: Purchase office supplies (I also got these at Walmart. DUH, same shopping trip)Mason picked these because they looked like his school colors. You could totally get cheaper ones. I think Staples even has them in a dollar section.Pictures 038Step 3: Pick out 3 pieces of paper from your scrap box or head over to your local paper store.

Step 4: I didn’t take a photo of this step so if I don’t explain it well enough, check out Jennifer's post. All you need to do is take your top paper and trace the outline of the lid onto and cut it out. Next cut a strip from your 2nd paper. And then outline the bottom of the lid on your 3rd piece of paper and cut out. You can make these any width size you choose. Glue the 3 pieces of paper together. BUT do NOT glue them to the lid!Pictures 044Step 5: Decorate the lid with your teachers name.Pictures 013Step 6: Fill the craft box with all your goodies. I threw in some chocolate candies. Pictures 016Step 7: Cut a piece of ribbon long enough to wrap around the craft box and tie in a bow. Once you do this… wrap it around the box and tie into a bow. :)Pictures 018Step 8: Now glue your paper over the ribbon. You are finished!Pictures 019

Mason and Ms.Clausen on the last day of Kindergarten:Pictures 022

Thursday, April 15, 2010

The Longest Project EVER!

Holy Moly!! Did this project take long or what?! I swear; every time I got started sewing my squares together, something else would come up. I finally put my foot down and decided enough is enough; this blanket is getting done before I start any other projects!

I am pleased to say, Baby Girl is FINALLY able to enjoy her rag quilt. It turned out much bigger then what I was planning, but that is completely my fault. I couldn’t resist adding more prints and rows each time. I used 6.5 squares with a .5 seam, which I think for the next one I’ll make the seam a little larger. That way it looks a little more “ragged”. Of course I ran into a few kinks along the way, but I figured that would happen with being a beginner. Hopefully I’ll work everything out on the next one and then work on a tutorial. But for the time being, I’m going to watch my little girl enjoy her blanket. :) 

Rag Side:Picture 5081Close Up of Rag Side:Picture 5082Back Side:Picture 5083

Friday, April 9, 2010

3 Little Monkey’s

Three little monkey’s jumping on the bed… Ok, not quite yet. These three little monkey’s are just 7 weeks. But, my cousin Tawny, better not shut her eyes because they’ll be doing it soon enough! Along with much, much more!  24838_408200394223_663499223_5079505_114110_nTawny choose a 3 little monkey’s theme for the nursery so I decided to make her monkey receiving blankets. In my opinion you can NEVER have to many receiving blankets with one child, so I’m going to guess it’s the same for triplets. Times 3! I could be wrong though, but I’m normally not. :) Picture 4927 Picture 4930 Picture 4932